User Interface
GUI
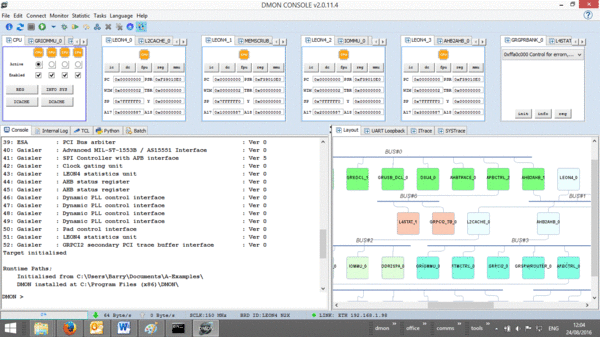
DMON has a rich GUI, divided into several regions.
There is a menu at the top
• File: opens a file selection dialog, selected file will be copied to the command line.
• Edit: allows copy and paste from the console. This can also be done using the mouse and the usual short cuts.
• Connect: connection dialog.
• Monitor: Data Monitor menu.
• Tasks: allows configuration of various automated tasks.
• RTEMS: RTEMS Thread display (available only once an RTEMS application has been loaded).
• Statistics: LEON4 Statistics module configuration and display.
• Language: Allows selecting the scripting language for DMON.
• Help: provides information about DMON
• List available DMON commands
Below the menu there are some buttons which control the running of programs, setting of breakpoints etc.
Below that is a row of widgets, one for each device identified on the target.
There are two tabbed panels below the widgets; on the left the default view shows the command console (which is also shown if no GUI is present); this panel also has tabs to show the internal log; and three tabs which act as scratchpads with syntax highlighting for Tcl, Python or plain DMON scripts. The right hand panel has 4 tabs. The Layout tab shows the configuration of the SoC. The UART Loopback tab separates the characters read from each UART loped back UART and permits enabling and disabling UART loopback for each one. The SYSTrace and ITrace panels are refreshed with the latest trace information after a program halts. These are only shown if the associated hardware is available on the target.
Each of these GUI elements is described along with the associated functionality elsewhere in this document.
Layout Panel
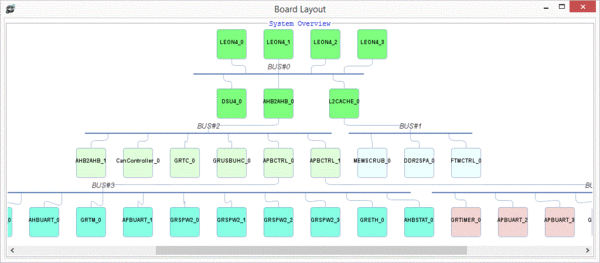
When the board configuration is established on start up a graph of the devices and the buses to which they are attached is calculated and displayed in the tabbed panel on the right. This display can be scrolled and can also be made a floating window. Clicking on any of the nodes in the graph brings the associated device widget to the foreground in the device widget display where it is highlighted.
Device Widgets
A widget is added to the display on top of the DMON window for each device identified on the board; in addition there is a composite CPU widget which pulls together the different processor cores, allowing them to be activated.
These widgets are tiled in a line across the top of the DMON window, filling the available spaces, and then stacking. A double click on the “+” symbol on any widget will open it as a floating window.
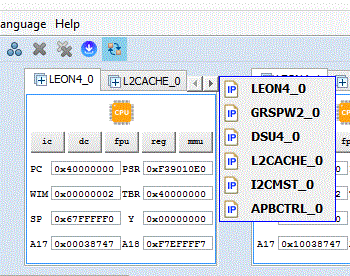
If the mouse is brought close to a stack a drop down list of which devices are in the stack is displayed and one can be selected to be brought to the foreground.
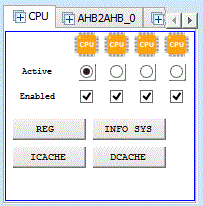
In a multiprocessor system there is a summary widget for the CPUs. The “active” CPU preselects a CPU for commands, see the “cpu” command; and as the buttons on this widget issue commands, they apply to the active CPU only. Only one CPU can be selected as “active”. If a CPU is not enabled it cannot be started by an application running on the target. The colour of the CPU icon changes according to the status.
Powered down Running Debug Error Halted
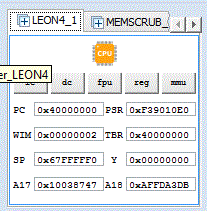
Each CPU has its own widget, varying slightly according to the CPU. The diagram shows a LEON 4 widget. The buttons open a further widget to deal with the specific item. The register displays are also clickable and display register details as is done for other widgets.
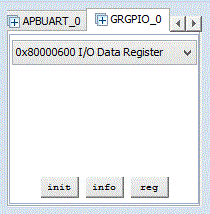
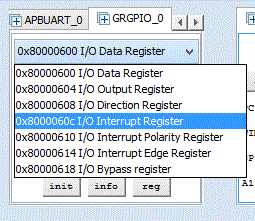
The standard widget for each device shows three buttons, and if there are registers in a device, a drop down list of those registers. The init button calls the init method on the device – in many cases this is an empty operation but for some widgets it will reset registers. The init method is also called after board initialisation.
The info button prints the information that applies to this device in the “info sys” command output. At a minimum it shows that Name, version and address ranges.
The reg command will print the registers associated with the device, if any, to the DMON console.
The drop down list allows the user to select a register in the device to be displayed in a dialog which has greater detail and permits modifying the register.
Register Dialog
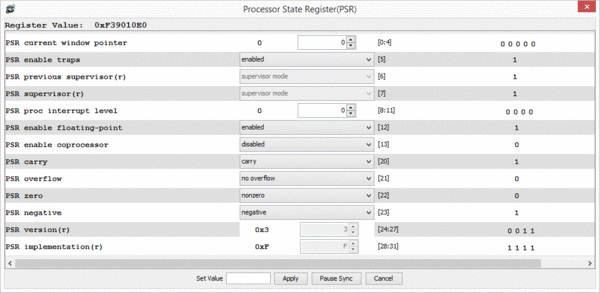
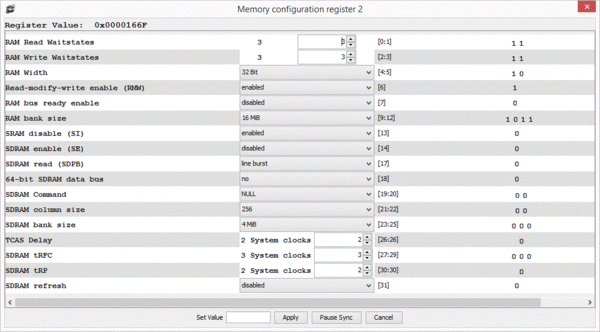
Each register in each device can be edited and displayed via a GUI element similar to the one below:
• The title of the widget shows the register name according to documentation
• The register value is shown as a 32 bit hexadecimal value
• Each field in the register is displayed
- o Read only fields are not editable
- o A single bit field will be displayed as a drop down list with the active value selected
- o Multi bit fields may be treated as integers or as enumerations; in the case of integers an offset and/or scale may be applied in the display – for example TCAS Delay above.
- - Integers can be changed by typing a new value in the editable window; the human readable value is shown to the left, with units as appropriate.
- - Enumerated values can be chosen from the drop down list.
- o On the right of the widget the bits are displayed; clicking on a bit toggles its value and this will be reflected in the rest of the display.
- o The register value on the board is polled in the background. Changes made in the dialog are not applied to the board until the “Apply” button at the bottom is pressed. To facilitate changing fields, the “Pause Sync” button can be pressed, then the value will no longer be read from the board. The button will become a “Resume Sync” button; values can be read again from the board by pressing it.
- o A literal value for the whole register can be entered in the dialog window in the same row as the buttons.
- o “Apply” applies the edited value to the hardware register
- o “Cancel” closes the dialog without making any changes
Console commands
The commands available depend on the target system to which DMON is connected. If a particular device is not present, the commands associated with it also will not be present. The help command lists the currently available commands.
Console commands are typically of the form command parameter1 parameter2 etc. Spaces or commas are used as parameter separators. A comma is required only when a parameter starts with plus or minus and follows another parameter, e.g. write 0x40000000 + offset , -20 & 0xffffffff 10 writes the value 0xffffffec to 10 words starting at address 0x40000000+offset.
When command parameters represent integer values they may be given as expressions that involve numerals, symbols and operators.
A full list of DMON command is given here.
Expressions and symbols
A command parameter that is an integer can be given as an expression involving numerals, symbols and operators, e.g. examine 0x40000000, examine main, examine main + 0x1000 * (count + 1).
Operators are +,-,*,/,%,>>,<<,&,^,|, (, ), with the standard precedence, so evaluation order may differ from that in which operators appear, e.g. examine 2+3*4 evaluates to examine 14, not to examine 20.
Binary numerals start with ‘0b’ or ’0B’, hexadecimal with ‘0x’ or ‘0X’, other numerals that start with 0 are octal (N.B.), and numerals that do not start with 0 are denary (base ten).
Symbols begin with an alphabetic character or underscore ‘_’. They do not contain white space, control characters, the character ‘:’ nor the characters ‘[‘ or ‘]’ .
Expressions can include white space, and evaluate to 64 bit long integers. Some commands may reject parameters outside a 32 bit range, making it necessary to 'and' a result with 0xffffffff. In particular this may be needed when results have negative values.
Symbols may be user defined or come from one or more loaded program images. There are also internal DMON symbols generally not used after DMON startup.
The same symbol may be defined in different sources. The instance to use can be specified by prefixing the symbol with a source identifier, e.g. myfile3:main, _user:a.
When a source identifier is used, the symbol is looked for in that source only. Evaluation fails if the symbol does not exist in that source, even though it exists elsewhere.
When no source identifier is used, a symbol is looked for first in DMON’s internal symbols, then in user defined symbols, and finally in the program images. If it cannot be found, or exists only in program images but with differing values, evaluation fails.
A warning is given if a user creates a symbol that conflicts with an existing symbol. The definition takes place and will shadow that symbol in loaded images unless a source identifier is used.
The value associated with a symbol can be found in a number of ways:
   lookup symbolname      returns the value currently associated with symbolname.
   find symbolname        finds all occurrences of the symbol unless symbolname includes a source identifier
                              (e.g. myimage:sym), in which case only the specified source is searched.
All symbols that occur in the currently loaded images can be displayed in value order:
symbols <file> show all symbols in currently loaded images or adds symbols from a file.
Further commands are provided for dealing with user defined symbols.
User defined symbols
In client-server mode, user defined symbols are known only on the client.
User defined symbols can be constants or variables.
- Constant symbols are assigned a value calculated when the symbol is defined. This only changes when the symbol is redefined
- Variable symbols are assigned an expression. This is re-evaluated each time the symbol is used
Commands:
   setv symbolname expression      create a constant symbol, the expression is evaluated when the
                                       ‘setv’ command is executed, and a 64 bit long integer value
                                       assigned to the symbol.  Any language in use has its symbol table updated.
   set symbolname expression       create a variable symbol,  the expression is re-evaluated each time the
                                       symbol is used. Any language in use has its symbol table updated with the
                                       initial value only.
   show <symbolname>               shows the expression or value corresponding to the given symbolname,
                                       or shows all user defined symbols in alphabetical order.
   delv [symbolname|#]             delete the user defined symbol or delete all user defined symbols
Examples :
   setv a 5        a now has the value 5
   setv b a + 7    b now has the value 12
   set  c a*b      c will evaluate to 60 when next used
   setv a 3        a now has the value 3
                   b is still 12, unchanged
                   c will evaluate to 36 when next used
Lookup can be restricted to user defined symbols only using the source identifier “_USER:” or “_user:” .
If no source identifier is given, user defined symbols are shadowed by DMON’s internal symbols as these are looked up first. User defined symbols themselves take precedence over symbols defined in the loaded program images.
